BMW 3 Series E46 2001 330Ci
Convertible with Navigation Unit and no factory or OEM CD Changer
"How-To" Install Your
PhatBox
By Kevin A. McGrail
These directions may void
warranties, cause sterility, or just not work. FOLLOW AT YOUR OWN RISK.
Tools I used:
Small Zip Ties
1/8” Pop Rivets
Drill
Socket Set and Ratchet
A few sizes of Flat Head Screwdrivers
Ice Pick / Punch / something sharp
and pointy
Duct Tape (to repair the light I
broke)
Task 1 -- Remove the foamy/furry
left panel of the trunk
Step 1 --
Remove the trunk floor by simply lifting up the panel
Step 2 --
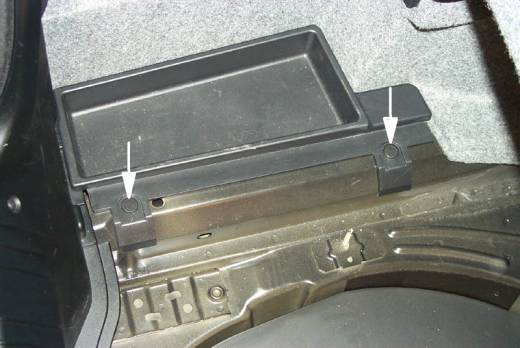
Remove the left-side, bottom plastic trunk tray
Notes: There are two rivets holding the trunk tray down. Each rivet is actually two pieces of plastic. One is a seat that goes into the hole. The other is a rivet that when pushed into the seat, causes the seat to expand and provide the holding power.
I used a flat head screwdriver and slowly pried the rivet away from the seat until and then used needle nose pliers to pull it out cleanly.
These were quite tough to remove and I recommend taking some time and care. Then again, I imagine these parts costs just pennies to replace if you break one but I didn’t want to find out
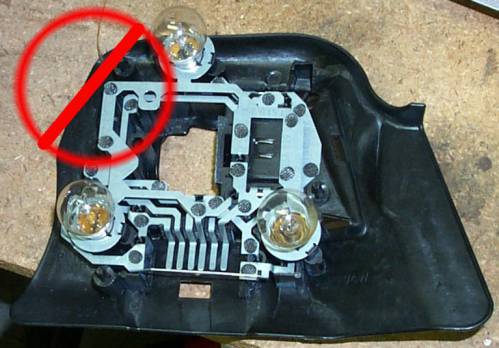
Step 3 -- Remove the left rear tail light assembly.
Notes: I broke this assembly removing it. Don't be like me.
In the center of the light is a small tab you pull towards the center of the car and the whole assembly pops off. I then used a flat head screwdriver to depress a small tab and removed the wiring harness plug to avoid damaging the light.
Step 3 -- Remove the left side rivets.
Notes: Other than the color, these are pretty much the same as the last rivets.
Step 4 –
Remove the left side plastic tub that is in the space the PhatBox is installed
above
Notes: Just pull it out. Trust me. It comes out.
Step 5 –
Remove the left side foamy/
Notes: It’s a pain but the stuff is semi-rigid/flexible and I pulled the part by the taillight out first.

Task 2 -- Remove the bracket for the
CD Changer / NAV unit from the trunk.
Step 1 – Remove
the CD Changer Pre-wired cables that are taped to the CD Changer bracket in a
Foam Protector.
Step 2 – Unhook
the Navigation computer from the brackets
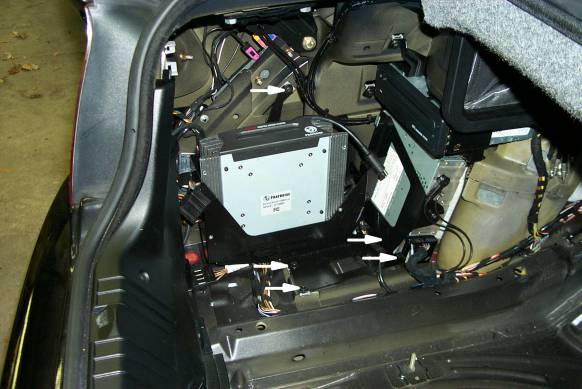
Notes: Undo the three bolts on the Navigation computer and WITHOUT removing any wires you can then maneuver the unit out of the space and set it just out of the way.
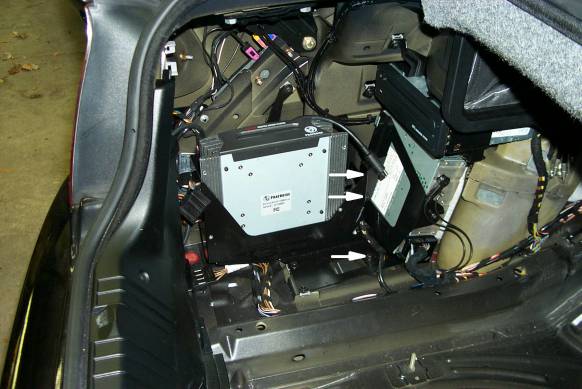
Step 3 –
Remove the CD Changer Bracket
Notes: Undo the 5 bolts for the bracket and remove from the car completely.
Task 3 – Drill the bracket and attach
the PhatBox
Step 1 – Mark
the holes
Notes: The PhatBox needs to be mounted as High and as Far back in the car as possible. Simply line it up in the bracket so this will be achieved and mark your drill points with something pointy and sharp.
Step 2 – Drill the holes
Notes: I used 1/8” Pop Rivets so drill your holes with a 1/8” bit.
Step 3 – Pop Rivet the PhatBox to the Bracket
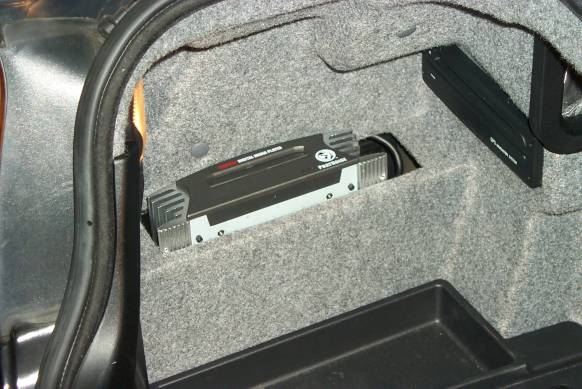
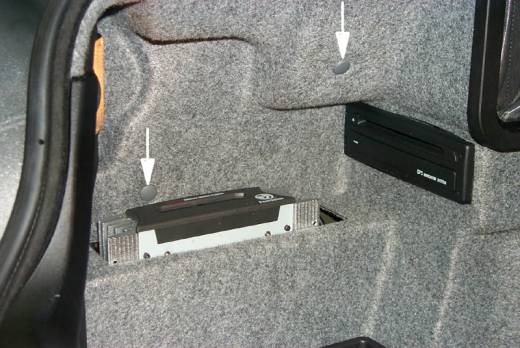
Task 4 – Mount the PhatBox
Step 1 – ATTACH
THE BLITZSAFE CABLE TO THE UNIT!!!
Notes: Once the bracket with the PhatBox is mounted in the car, you won’t be able to reach the cable. ATTACH IT NOW.
Step 2 – Place the PhatBox in the car
Notes: I routed my cable towards the back and looped it upwards and back towards the front.
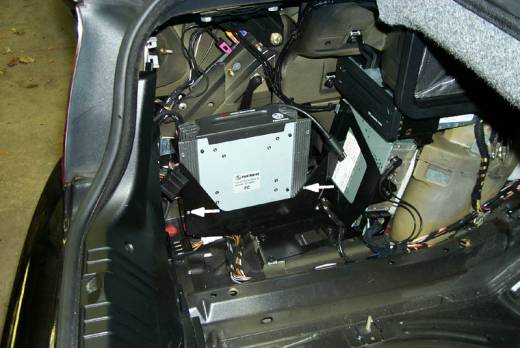
Step 3 – Finger tighten the 5 bolts that hold the CD Changer Bracket
Step 4 – Tighten the front most two bolts.
Step 5 – Maneuver the NAV Computer back into place
Step 6 – Finger tighten the 3 bolts that hold the NAV Computer in place
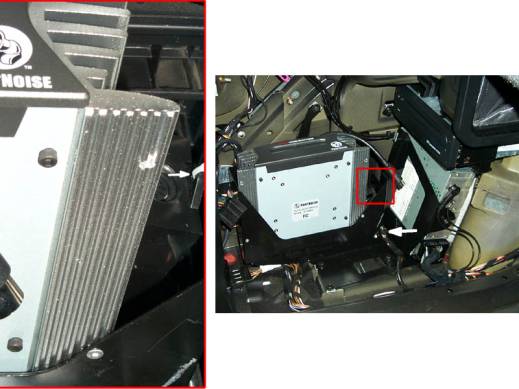
Step 7 – Route the pre-wired CD Changer cables through the hole shown in the photo below.
Step 8 – Plug the pre-wired cables into the BlitzSafe Converter
Step 9 – Zip tie the converter to the bracket as show in the picture
Task 5 – Plug in the PhatBox & Test
Step 1 – Attach
the round cable from the PhatBox to the BlitzSafe converter.
Notes: The cable is difficult to plug in all the way and the BlitzSafe is a rather “cheap” part. I braced the converter with one hand from below and carefully inserted the cable.
Step 2 – Insert the DMS cartridge and follow the normal manual to make sure everything works
Task 6 – Tighten Everything: Assuming
everything worked, it’s time to finalize everything.
Step 1 – Tighten
the 3 bolts that hold the navigation unit
Step 2 –
Tight the 3 remaining bolts that hold the CD Changer Bracket
Step 3 –
Zip tie the Cable from the PhatBox going to the BlitzSafe to one of the cable
bundles on the left hand wall just to keep it neat
Step 4 – Remove the DMS cartridge
Task 7 – Put everything back
Step 1 – Put the Foamy/Furry Stuff back.
Notes: This was the hardest part of the job. I put the back in first and just worked it so it went over top of the PhatBox and around the NAV CDROM. It took a while to get all the trim back correct but eventually you will be done.
Step 2 – Put back the two gray rivets for the wall
Step 3 – Put the tray back with the two black rivets.
Step 4 – Put the Trunk floor back
Step 5 – Put the DMS Cartridge back